The Ultimate Setup Guide for Your Peak Design Pro Tripod
For decades, the tripod was a piece of equipment that many photographers viewed as a necessary evil. It was often the bulkiest, most cumbersome item in a gear bag, yet indispensable for long exposures, landscape photography, and sharp studio work. When Peak Design entered the tripod market, they did so with the intent of fundamentally reimagining what a professional-grade stabilization system could look like. The result, the Peak Design Travel Tripod (often referred to by professionals as the Pro Tripod in its Carbon Fiber iteration), represents a masterclass in spatial efficiency and industrial design. This guide provides a comprehensive walkthrough of how to master this specific setup, ensuring that every lever, dial, and leg extension is optimized for peak performance in the field.
Understanding the Architecture of Efficiency
The defining characteristic of the Peak Design Pro Tripod is its elimination of "dead space." Conventional tripods, when collapsed, feature a significant amount of empty air between the legs and the center column. Peak Design mitigated this by designing a center column with a triangular profile and legs that nest perfectly against it. This architectural choice is what allows the tripod to remain roughly the diameter of a water bottle while providing a maximum height that competes with full-sized professional sticks. Understanding this geometry is the first step in a successful setup. Because the tolerances are so tight, the order in which you deploy and stow the tripod matters more than it might with a traditional round-leg system.
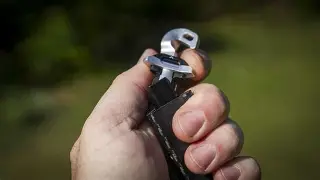
When unboxing the unit, users will immediately notice the integrated tool kit located in a small clip on the leg. This tool is essential for long-term maintenance and for swapping out the standard plate for different mounting options. The Pro version, specifically the carbon fiber model, is engineered with high-modulus vibration-damping materials that are significantly stiffer than the aluminum counterpart. For photographers shooting on high-resolution sensors exceeding 45 megapixels, this stiffness is not just a luxury; it is a technical requirement to prevent micro-blur during outdoor shoots where wind resistance becomes a factor.
Detailed Product Analysis: Engineering for the Field
The Peak Design Pro Tripod is more than just a set of legs; it is a integrated system consisting of the legs, a proprietary ball head, and an ecosystem of compatible plates. The most controversial and innovative part of this setup is the "low-profile" ball head. Unlike traditional ball heads that feature large, protruding knobs for tension and locking, Peak Design utilizes a single adjustment ring. Turning this ring allows the user to unlock the ball in a single motion, move the camera into position, and lock it back down. This streamlined approach significantly reduces the chances of the tripod snagging on brush or clothing while moving between locations.
The legs themselves utilize a cam-lever locking system rather than twist locks. While the "twist vs. lever" debate is eternal among photographers, these specific levers are designed to be operated simultaneously. A practiced user can flip all four levers on a single leg with one hand movement, allowing the tripod to transition from a collapsed state to full extension in under ten seconds. This speed is critical for wildlife photographers or those chasing the fleeting light of a "blue hour" transition.
One of the most overlooked features is the weight hook at the bottom of the center column. In high-wind scenarios, even the best carbon fiber can benefit from additional ballast. By hanging a camera bag or a dedicated sandbag from this hook, the center of gravity is lowered, significantly increasing the stability of the entire rig. Furthermore, the unit features a hidden mobile mount stored inside the center column, reflecting the modern reality that even professional photographers frequently use their smartphones for behind-the-scenes content or secondary time-lapse footage.
Pros and Cons of the Pro Tripod System
- Ultra-Compact Form Factor: The ability to slide a professional-grade tripod into the side pocket of a backpack rather than strapping it to the outside is a game-changer for international travel and hiking.
- Industry-Leading Deployment Speed: The cam-lever design and nested legs allow for a setup time that is roughly twice as fast as traditional professional tripod designs.
- Ergonomic Ball Head Design: The single-ring adjustment system is intuitive and reduces the overall footprint of the tripod head, making it easier to pack and handle.
- Integrated Maintenance Tools: Having the hex tools clipped directly to the leg ensures that you are never stranded in the field with a loose plate or a slipping leg segment.
- High Vibration Damping: The carbon fiber construction in the Pro model excels at absorbing high-frequency vibrations that could otherwise ruin a long-exposure shot.
- Standard Arca-Swiss Compatibility: While optimized for Peak Design’s own plates, the head is compatible with most standard Arca-Swiss plates, allowing for easy integration into existing camera kits.
- Head Height Limitations: Because the ball head is recessed into the tripod for compactness, it has a more limited range of tilt compared to traditional heads unless the center column is slightly raised.
- Proprietary Plate Nuances: While Arca-Swiss compatible, the best performance is achieved using the Peak Design Square Plate, which may require some users to switch out their existing mounting hardware.
- Price Point: As a premium carbon fiber product, the Pro model represents a significant investment that may be overkill for casual hobbyists.
- Sand and Debris Sensitivity: The tight tolerances of the nested legs mean that extra care must be taken when shooting in sandy or silty environments; regular cleaning is mandatory to prevent grinding.
Technical Specifications and Comparison
To understand where the Peak Design Pro (Carbon Fiber) fits into the market, it is helpful to look at how it compares to standard aluminum travel tripods and traditional studio-grade carbon fiber legs.
Discover deals on Cameras & Photography — updated daily.
Shop Amazon →| Feature | PD Pro (Carbon) | Common Aluminum Travel | Traditional Pro Carbon |
|---|---|---|---|
| Collapsed Diameter | 7.9 cm (3.125") | 10-12 cm | 13-15 cm |
| Max Height (Column Up) | 152.4 cm (60") | 140 cm | 165+ cm |
| Weight | 1.29 kg (2.81 lbs) | 1.5-2.0 kg | 1.4-2.2 kg |
| Weight Capacity | 9.1 kg (20 lbs) | 4-6 kg | 12-18 kg |
| Locking Mechanism | Aluminum Cam Levers | Plastic Levers/Twist | Heavy-Duty Twist |
Step-by-Step Setup Guide for Peak Performance
1. Deploying the Legs
The Pro Tripod features five sections per leg. For maximum stability, it is recommended to extend the thickest sections first. This means starting from the top lever and working your way down. If you do not need the full height of the tripod, leaving the thinnest bottom sections retracted will yield a sturdier base. Ensure that each lever is snapped firmly into place. If you ever feel a lever is becoming too "easy" to flip, use the included hex tool to tighten the tension screw on the cam, ensuring the leg remains locked under the weight of a heavy telephoto lens.
2. The Center Column Strategy
In tripod photography, the center column is generally the weakest point for vibration. The Peak Design Pro is designed to be very stable at its base height (with the column down). Only raise the center column when you absolutely need the extra elevation or when you need to tilt the ball head significantly. To raise the column, loosen the wing-nut style knob on the side, pull the column to the desired height, and re-tighten. Note that this center column can also be inverted for macro photography, allowing your camera to sit just inches above the ground between the tripod legs.
3. Mastering the Ball Head Ring
The ball head features a locking ring located just below the platform. Turn it counter-clockwise to loosen. A unique feature of this head is the "lockout" pin. To release your camera, you must turn the top quick-release dial and then press the button. This two-stage process prevents accidental drops. When setting your composition, hold the camera with one hand and adjust the locking ring with the other. Once you have reached the desired tension, a firm clockwise turn will lock the camera in place. If you find the ball head feels gritty, it usually indicates that dust has entered the socket; a quick wipe with a microfiber cloth usually restores the smooth action.
4. Leveling the Rig
While many modern cameras have digital levels built into the EVF, the Peak Design head includes a physical bubble level. This is particularly useful for panoramic photography where ensuring the panning plane is level is vital. If the ground is uneven, adjust the length of individual legs rather than relying on the ball head to compensate for a slanted tripod base. This keeps the center of gravity directly over the midpoint, providing the most secure setup for your gear.
Buying Guide: Is the Pro Tripod Right for You?
Choosing a tripod is a balance of three factors: weight, stability, and price. Typically, you can only choose two. The Peak Design Pro Tripod attempts to hit the "sweet spot" for several specific types of photographers. If you are a landscape photographer who hikes several miles to reach a location, the weight savings and packability of the carbon fiber model cannot be overstated. Saving even half a pound of weight can make a significant difference over an eight-hour trek.
For architectural photographers, the precision of the head and the ability to get into tight corners thanks to the slim profile is a major benefit. However, if you primarily shoot in a studio environment where the tripod is rarely moved, you might find that a traditional, heavier tripod offers more mass to resist bumps. The Pro Tripod is fundamentally designed for the photographer on the move. It is for the person who has perhaps stopped carrying a tripod because it was too much of a hassle, and now needs a solution that removes the friction of bringing professional stabilization to remote locations.
Looking for the best Cameras & Photography deals on Amazon?
See Deals →When considering the investment, look at your current camera and lens combinations. The Pro model is rated for up to 20 pounds, which covers a full-frame DSLR or Mirrorless body with a 70-200mm f/2.8 lens with ease. If you are frequently shooting with 400mm or 600mm "super-telephoto" lenses, you are reaching the limits of what any travel tripod can comfortably handle, and you might consider a dedicated gimbal head or a heavy-duty systematic tripod instead.
Advanced Adjustments and Long-Term Care
To keep the Peak Design Pro Tripod functioning like new, a small amount of preventative maintenance is required. After shooting in coastal environments, it is imperative to rinse the legs with fresh water. Saltwater is the enemy of all mechanical gear, and though the carbon fiber won't rust, the aluminum components and the internal bushings of the leg locks can suffer from salt crystallization. Simply extend the legs fully, wipe them down with a damp cloth, and let them air dry before collapsing them again.
The bushings inside the leg segments are user-replaceable. If over several years of heavy use, you notice the legs are not gliding as smoothly, Peak Design offers replacement parts that allow you to rebuild the mechanical interface. This "right to repair" philosophy is part of what justifies the premium price tag of the Pro line; it is meant to be a lifetime tool rather than a disposable accessory.
Finally, consider the environmental adjustments. In extreme cold, carbon fiber is much more comfortable to handle with bare hands than aluminum, which acts as a heat sink. However, in extremely cold temperatures, the carbon fiber can become slightly more brittle. Avoid high-impact shocks to the leg tubes in sub-zero conditions. In extremely hot and humid environments, ensure you don't store the tripod in a sealed bag while it is still damp to prevent mold growth on the internal components.
Conclusion
The Peak Design Pro Tripod is a significant departure from traditional equipment, trading conventional bulk for sleek, purposeful engineering. Setting it up correctly requires a brief learning curve—specifically mastering the cam levers and the locking ring—but once these movements become muscle memory, the tripod becomes an extension of the camera itself. By following the steps of deploying the thickest leg sections first, minimizing center column use, and performing regular maintenance after exposure to the elements, photographers can ensure their gear remains a reliable foundation for their creative work. Whether you are stojng on a windy ridge or a bustling city street, the Pro Tripod provides the rigid support necessary to capture professional-grade imagery without the traditional burden of professional-grade weight. Understanding these nuances of setup and care ensures that your investment continues to provide sharp, clear results for years to come.